Learn how to create bills in EasyBillMatic POS step by step. Explore product selection, order management, dine-in, takeaway, KOT, discounts, payment methods and receipt printing.
In this article
- How to Create a Bill in EasyBillMatic POS: Step-by-Step Guide (2026)
- Step 1: Open the EasyBillMatic Dashboard
- Step 2: Select Products from the Catalog
- Step 3: Review the Selected Products
- Step 4: Select Customer and Order Type
- Select a Customer
- Select the Order Type
- Select Order Status
- Step 5: Apply Tax, Discount, Shipping and Notes
- Order Tax
- Discount
- Shipping Charges
- Order Notes
- Step 6: Generate KOT or Customer Bill
- KOT – Kitchen Order Ticket
- Customer Bill
- Step 7: Select a Payment Method
- Full Payment or Split Bill
- Set Payment Mode as Default
- Step 8: Complete Payment and Print the Bill
- Complete & Print
- Complete Payment
- Example: Creating a Restaurant Bill
- Tips for Faster Billing with EasyBillMatic
- Frequently Asked Questions
- 1. How do I create a bill in EasyBillMatic?
- 2. Can I create a bill for a walk-in customer?
- 3. Can I create dine-in, takeaway, and delivery orders?
- 4. What is KOT in EasyBillMatic?
- 5. Can I print both the bill and KOT?
- 6. Which payment methods are available?
- 7. Can I apply discounts and shipping charges?
- Conclusion
How to Create a Bill in EasyBillMatic POS: Step-by-Step Guide (2026)
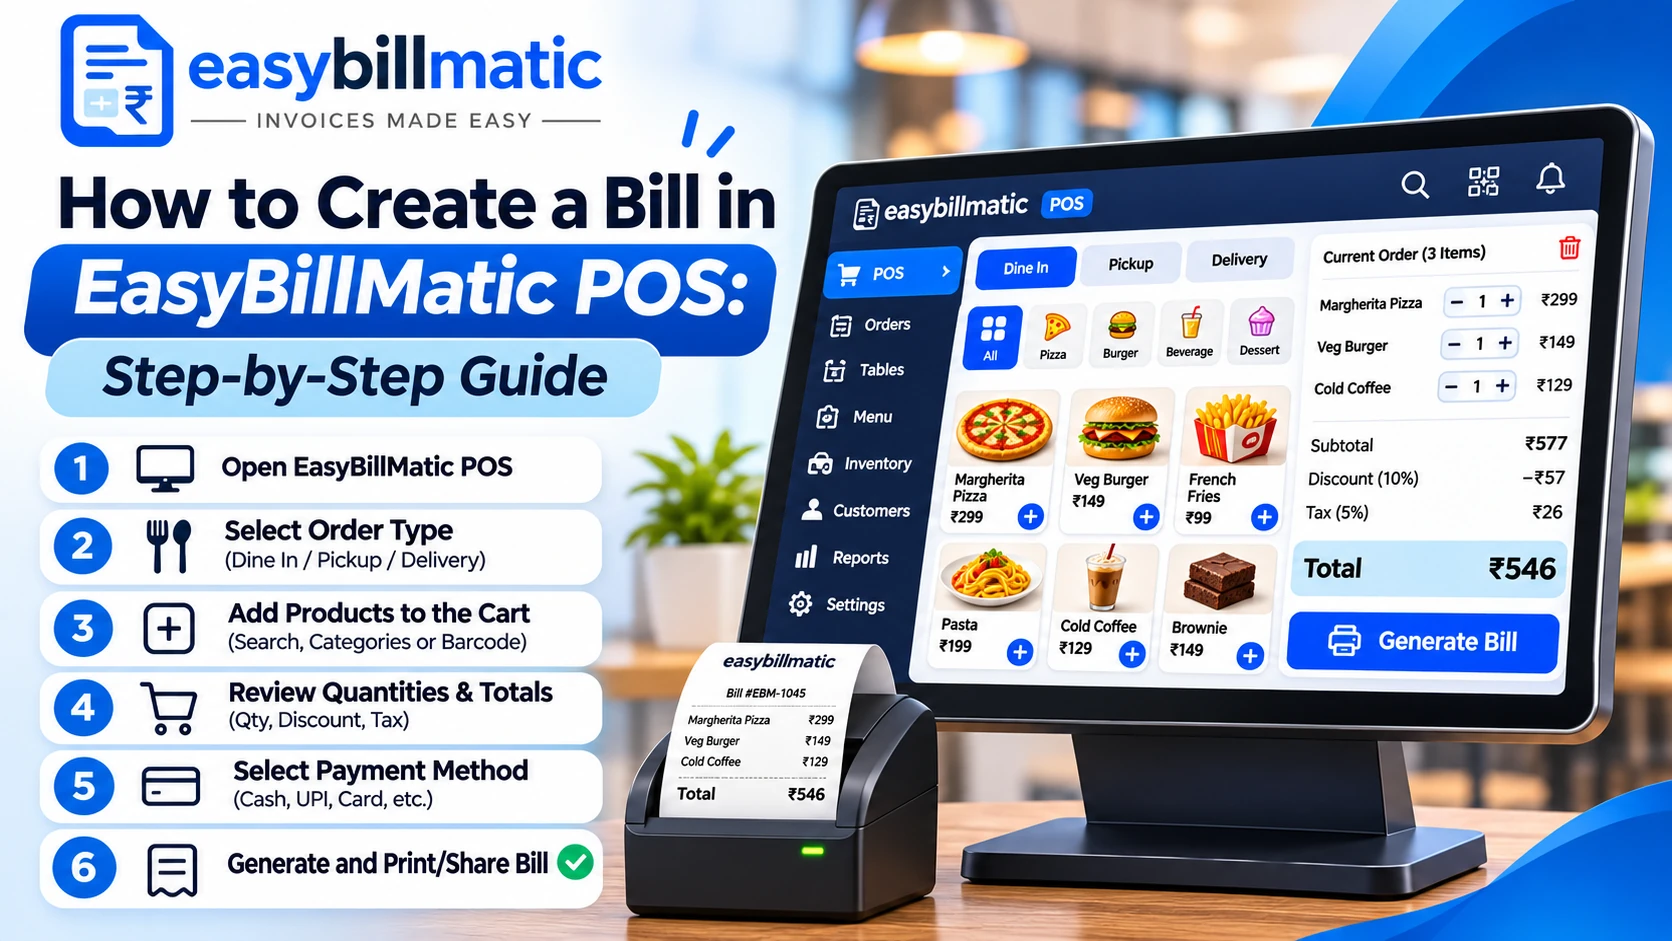
How to create a bill in EasyBillMatic is a common question for new restaurant and retail users. EasyBillMatic POS makes it easy to select products, add quantities, manage customer orders, apply discounts, generate bills, print receipts, and record payments through a simple billing workflow.
In this guide, we will explain how to create a customer bill using the EasyBillMatic mobile POS application, from opening the billing screen to completing the payment.
Step 1: Open the EasyBillMatic Dashboard
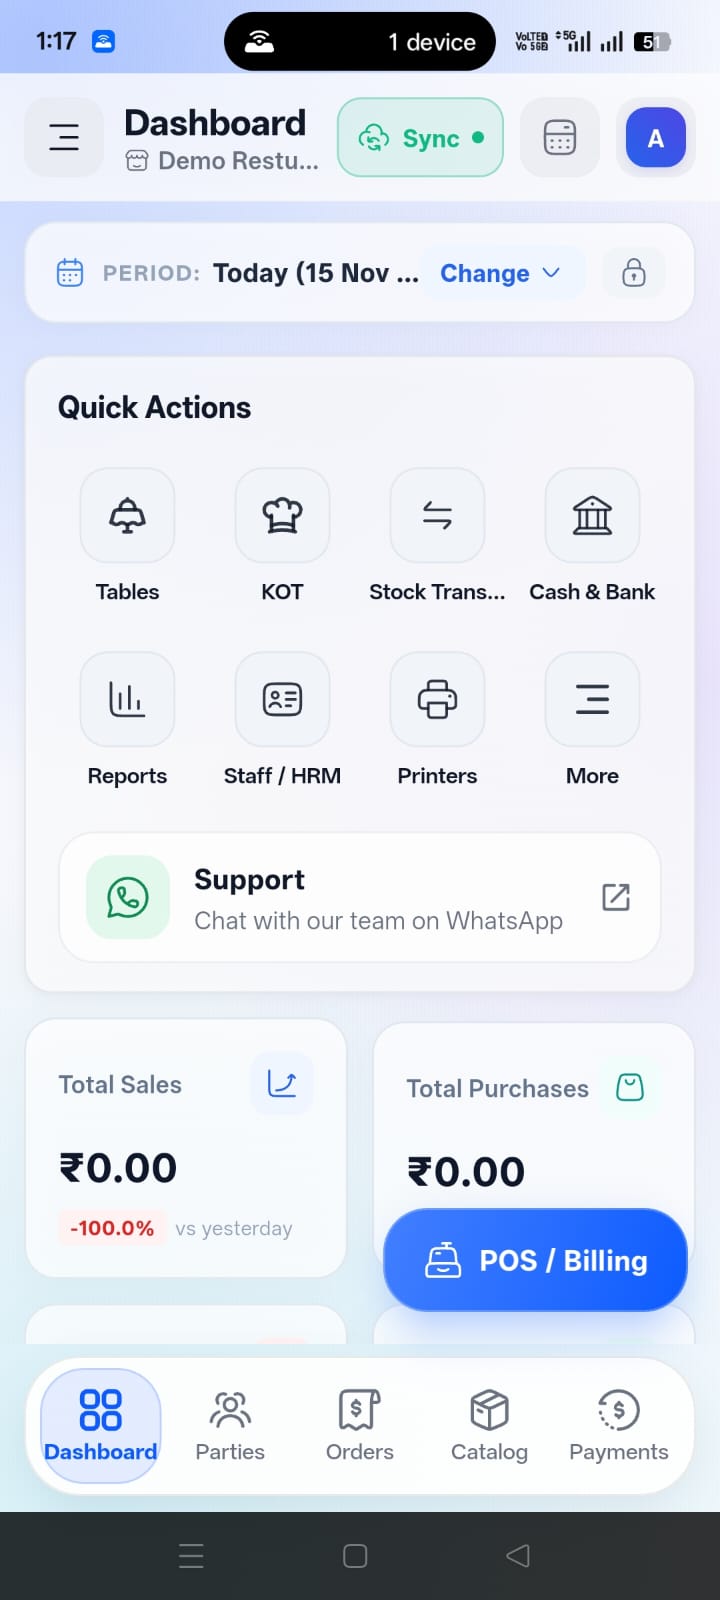
First, open your EasyBillMatic application and sign in to your business account. The dashboard provides quick access to important business operations, including tables, KOT, stock transfers, cash and bank, reports, staff management, and printers.
To start creating a bill, tap the POS / Billing button displayed on the dashboard.
You can also access the relevant billing functionality through the available application navigation, depending on your account configuration.
Step 2: Select Products from the Catalog
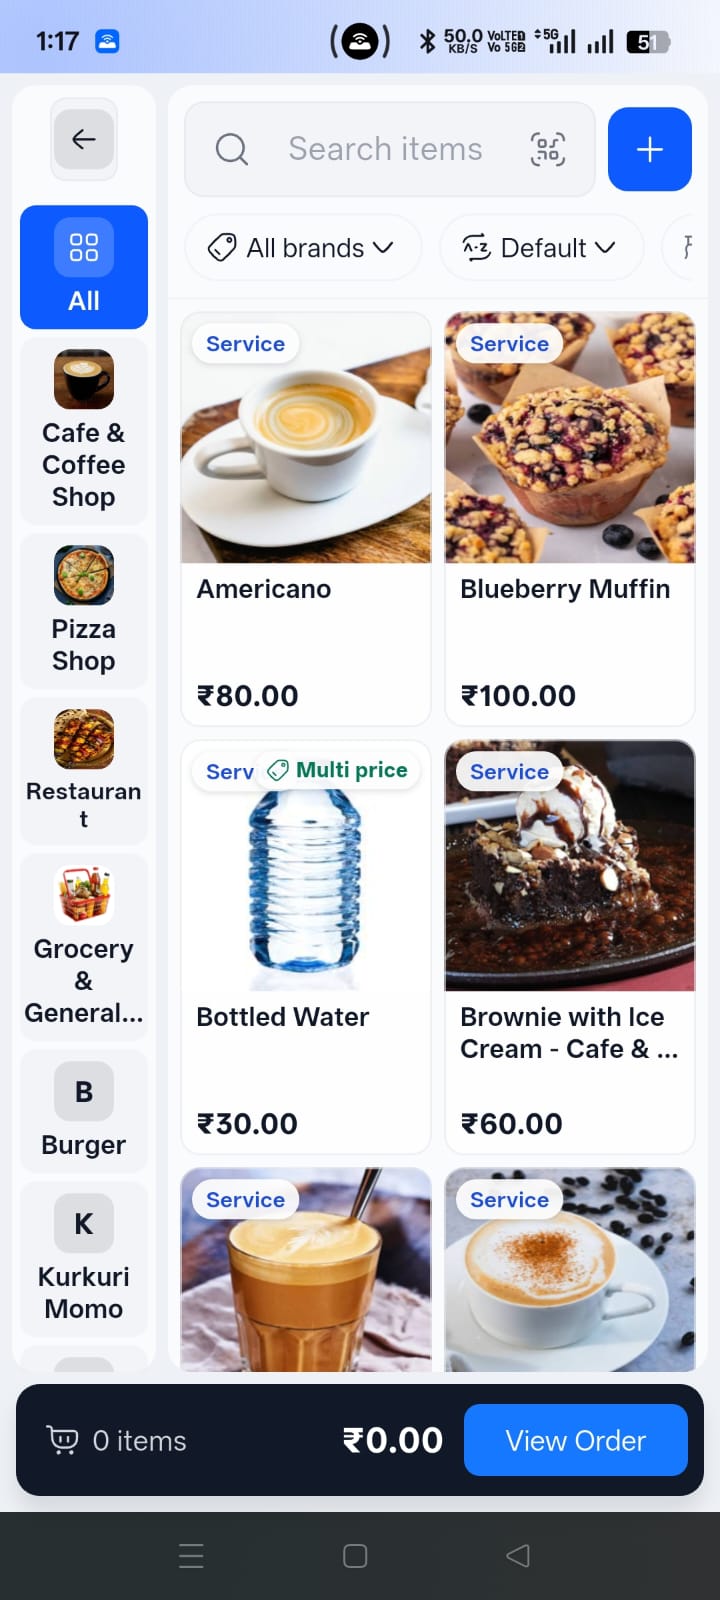
After opening POS Billing, you will see the product catalog screen. This screen displays your available products and categories.
Follow these steps:
Browse the available product categories from the left-side category panel.
Use the search bar to find a particular product.
Use the barcode scanner option to scan a product barcode, where supported.
Tap a product card to add it to the current order.
Use the plus and minus controls to increase or decrease the product quantity.
The product catalog also provides brand and sorting filters to help you find products more easily.
For example, if a customer orders one Blueberry Muffin and one Brownie with Ice Cream, select both products from the catalog.
Step 3: Review the Selected Products
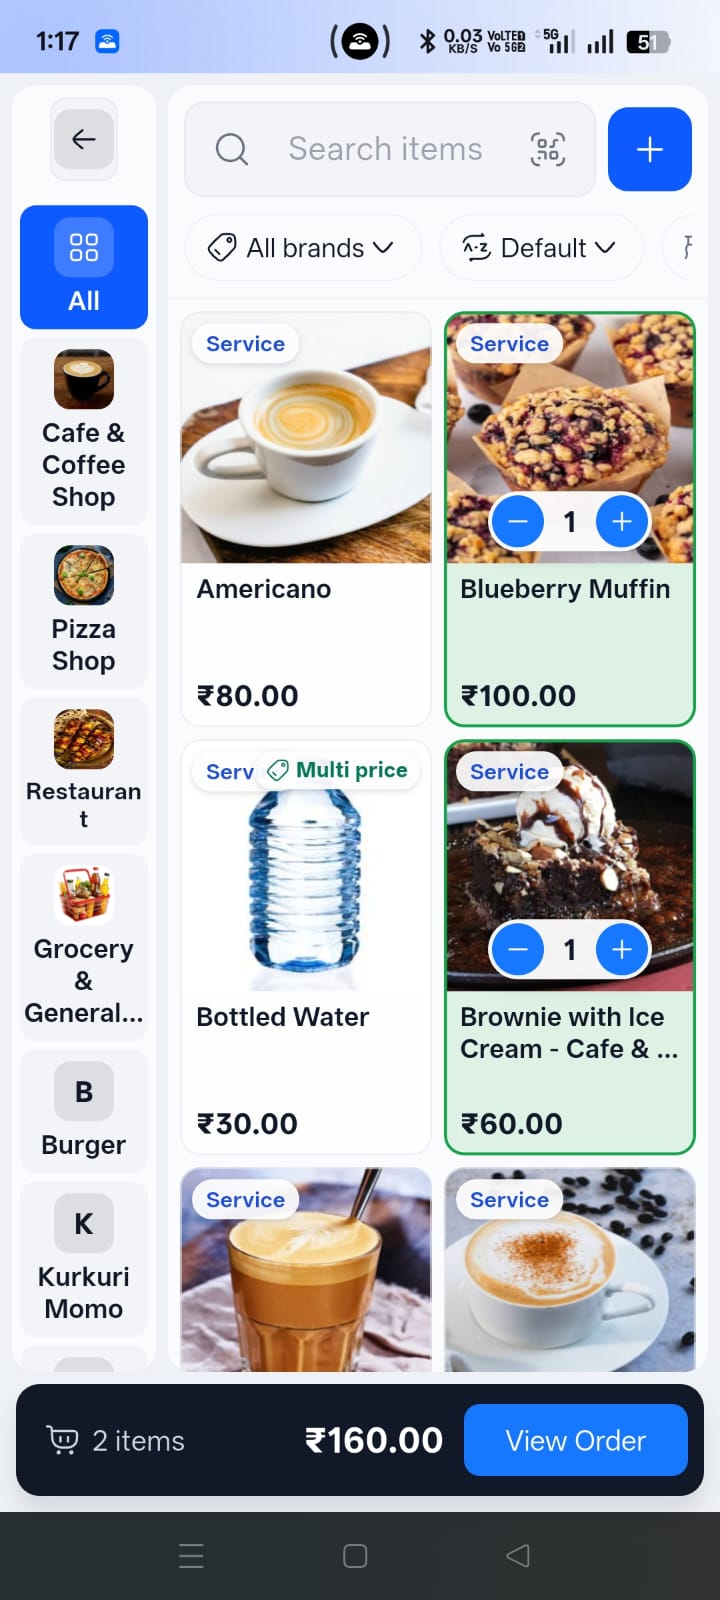
After selecting products, check the bottom order summary. It displays the number of selected items, the total amount, and the View Order button.
Tap View Order to open the current order screen.
Before continuing, verify that:
All requested products have been added.
Product quantities are correct.
Product prices are correct.
The displayed order total is accurate.
Step 4: Select Customer and Order Type
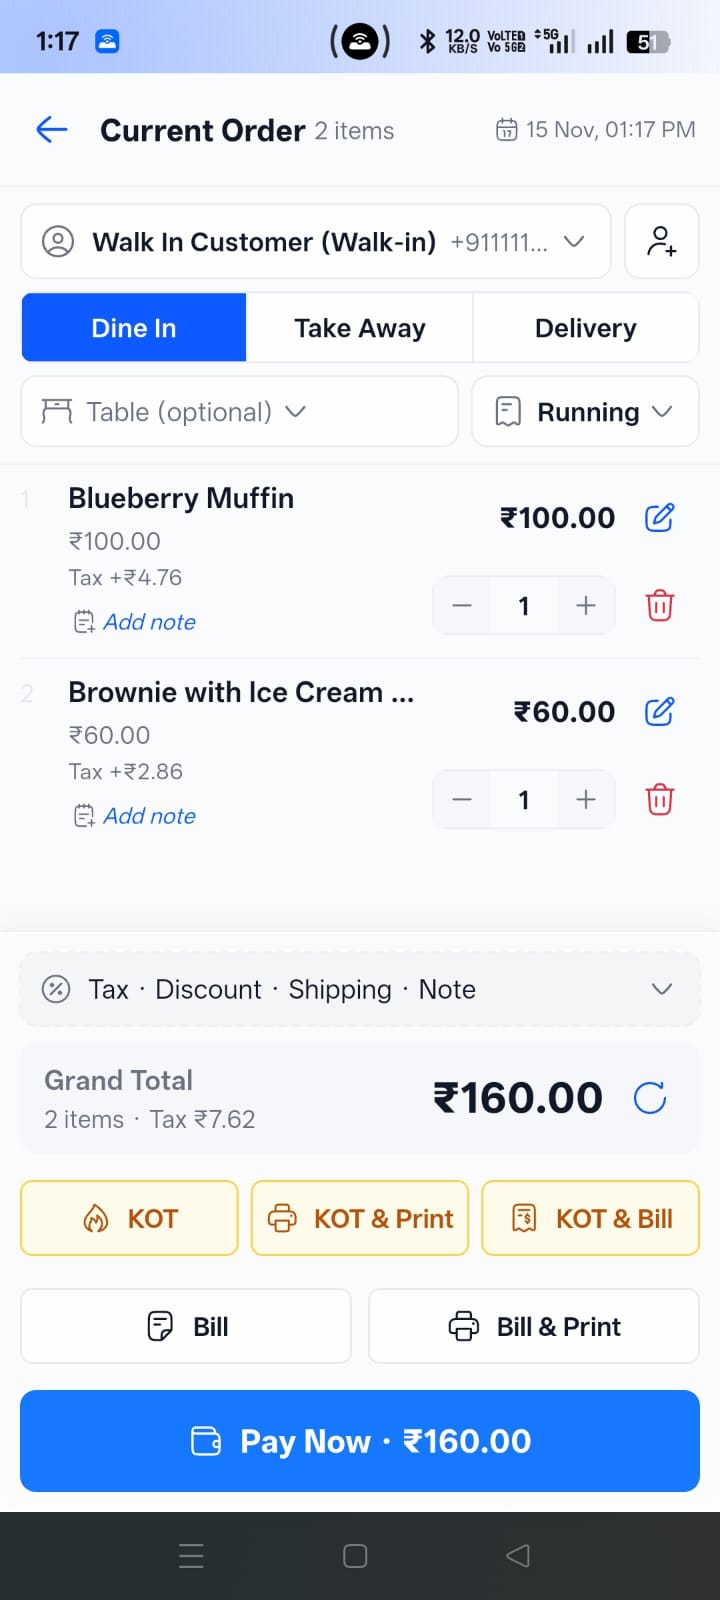
On the Current Order screen, you can select the customer and specify how the order will be served.
Select a Customer
The customer selection field allows you to choose a customer for the order. You can use the Walk In Customer option for customers who do not need an existing customer record. You can also use the customer-add option to add a customer when required.
Select the Order Type
EasyBillMatic provides three order types on the displayed order screen:
Dine In: Select this option for customers eating inside your restaurant.
Take Away: Select this option for customers collecting their food.
Delivery: Select this option for orders that need to be delivered.
For dine-in orders, you can also select a table using the available table selection field.
Select Order Status
The order screen also displays an order status selection, such as Running. Select the appropriate status according to your restaurant workflow.
Step 5: Apply Tax, Discount, Shipping and Notes
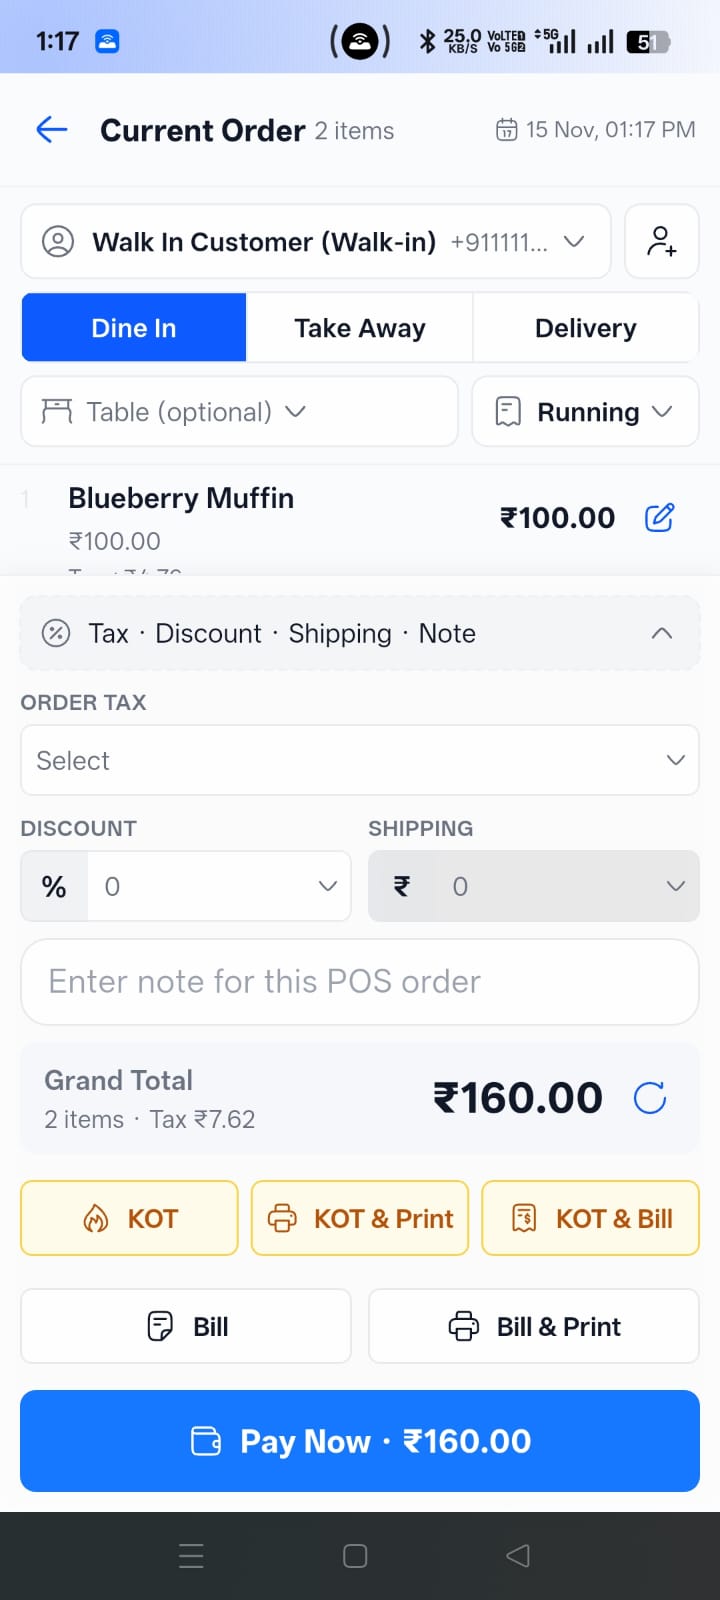
EasyBillMatic provides additional order settings to help manage the final bill.
Order Tax
Select the applicable tax configuration for the order when required. The order summary displays the calculated tax amount.
Discount
Apply a discount to the order using the discount field. The displayed interface provides percentage and amount-based discount selection.
Shipping Charges
For applicable orders, enter shipping charges using the shipping field.
Order Notes
Add special instructions or additional information in the order note field. This can be useful for communicating customer requirements.
After updating these settings, review the Grand Total to confirm the final amount.
Step 6: Generate KOT or Customer Bill
Once the order details are correct, EasyBillMatic provides different actions depending on whether you want to send the order to the kitchen or generate a customer invoice.
KOT – Kitchen Order Ticket
Use KOT when you want to send the selected food items to the kitchen for preparation.
The displayed screen provides three actions:
KOT: Generate the kitchen order ticket.
KOT & Print: Generate and print the kitchen order ticket.
KOT & Bill: Use the combined KOT and billing action.
Customer Bill
If you want to generate the customer invoice, use one of the following actions:
Bill: Generate the customer bill.
Bill & Print: Generate and print the customer bill.
Choose the appropriate action according to your restaurant's billing and kitchen workflow.
Step 7: Select a Payment Method
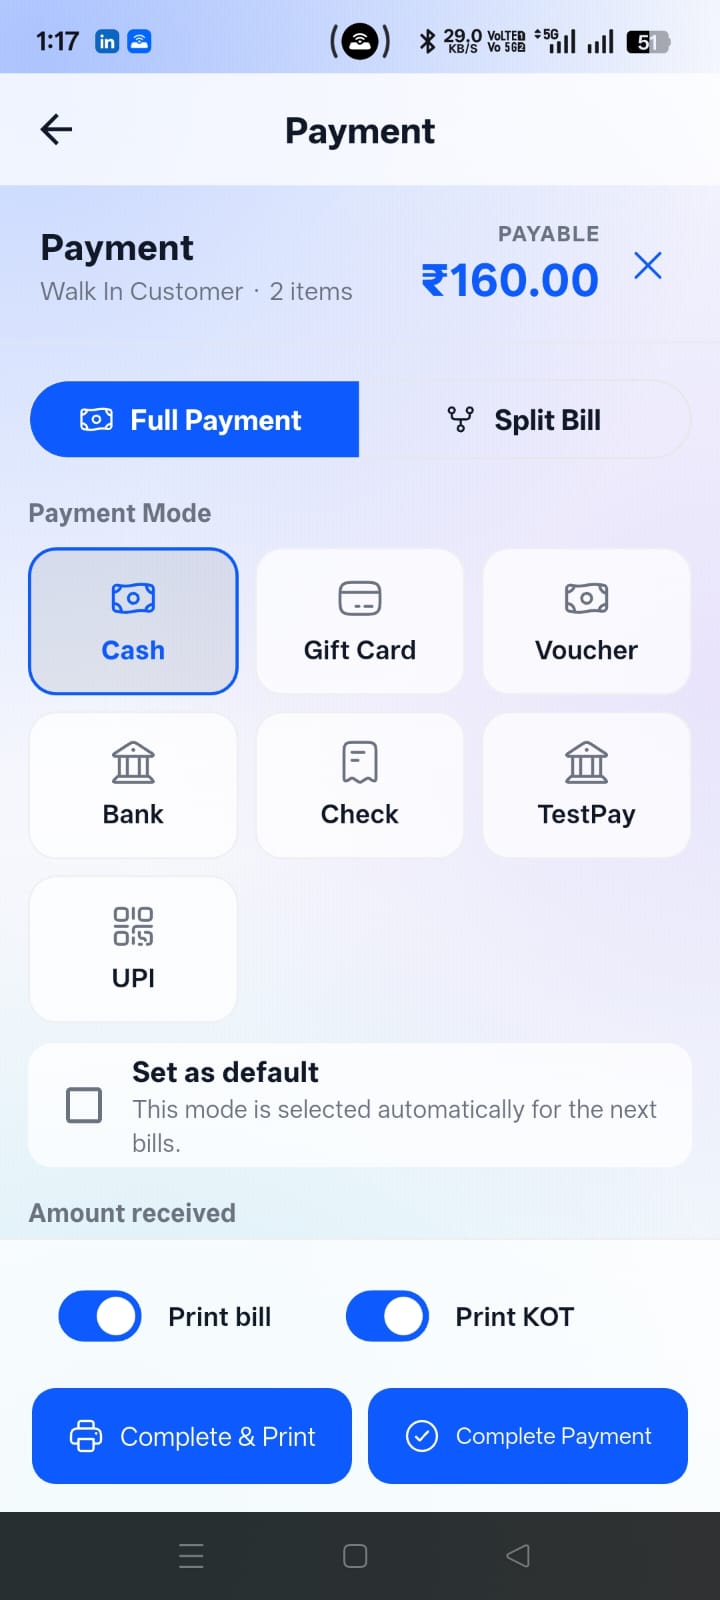
After proceeding to payment, the Payment screen displays the payable amount and customer order information.
EasyBillMatic provides several payment modes in the displayed interface:
Cash: Record payment received in cash.
Gift Card: Select gift card payment where applicable.
Voucher: Record voucher payments.
Bank: Select the relevant bank payment option.
Check: Record cheque payments.
UPI: Record payments received through UPI.
Other Configured Methods: Additional configured payment options may also appear.
Select the appropriate payment mode for the customer transaction.
Full Payment or Split Bill
The payment interface provides two options:
Full Payment: Use this option when the customer pays the complete payable amount.
Split Bill: Use this option when the bill needs to be divided according to the available split-bill workflow.
Set Payment Mode as Default
You can enable the Set as Default option to use the selected payment mode automatically for subsequent bills, as indicated on the payment screen.
Step 8: Complete Payment and Print the Bill
Before completing the transaction, review the payable amount and select the required printing preferences.
The payment screen provides two printing controls:
Print Bill: Enable this option when you want to print the customer invoice.
Print KOT: Enable this option when you want to print the kitchen order ticket.
After checking the payment details, choose one of the available actions:
Complete & Print
Choose Complete & Print to complete the payment and use the selected printing preferences.
Complete Payment
Choose Complete Payment to complete the payment without using the Complete & Print action.
Once the payment has been successfully completed, the transaction is processed according to the application's configured billing workflow.
Example: Creating a Restaurant Bill
Let's understand the complete process with a simple example.
A customer visits your cafe and orders:
1 Blueberry Muffin – ₹100
1 Brownie with Ice Cream – ₹60
Subtotal: ₹160
The displayed example order also shows tax of ₹7.62 and a Grand Total of ₹160.00 in the supplied screenshots. The displayed tax figures and totals should be understood as the values shown in that particular example, not as a general tax calculation rule.
To process this order:
Open POS Billing from the dashboard.
Select Blueberry Muffin and Brownie with Ice Cream.
Set the quantity of each product to one.
Tap View Order.
Select the customer and Dine In, Take Away, or Delivery.
Review the tax, discount, shipping, and note fields.
Choose the required KOT or bill action.
Select Cash, UPI, Bank, or another applicable payment mode.
Choose the printing preferences.
Complete the payment.
Your restaurant can follow this workflow to organize customer orders, kitchen communication, billing, and payment processing.
Tips for Faster Billing with EasyBillMatic
Organize Categories: Keep your product catalog organized so employees can find products quickly.
Use Search: Search for products instead of browsing long catalogs.
Use Barcode Scanning: Scan compatible product barcodes to speed up product selection.
Check Quantities: Verify item quantities before generating the bill.
Configure Printers: Set up compatible printers before using KOT and bill printing.
Verify Payments: Check the payment amount and selected payment mode before completing the transaction.
Train Staff: Make sure employees understand the order and payment workflow.
Frequently Asked Questions
1. How do I create a bill in EasyBillMatic?
Open POS Billing, select products from the catalog, adjust quantities, tap View Order, select the customer and order type, review the bill, select a payment mode, and complete the payment.
2. Can I create a bill for a walk-in customer?
Yes. The current order screen provides a Walk In Customer option for processing orders without selecting an existing customer record.
3. Can I create dine-in, takeaway, and delivery orders?
Yes. The displayed order screen provides Dine In, Take Away, and Delivery order types.
4. What is KOT in EasyBillMatic?
KOT stands for Kitchen Order Ticket. It helps communicate selected food items to kitchen employees for preparation.
5. Can I print both the bill and KOT?
The payment screen provides separate Print Bill and Print KOT controls. You can enable the required printing options according to your workflow.
6. Which payment methods are available?
The displayed payment interface includes Cash, Gift Card, Voucher, Bank, Check, and UPI options, along with other configured options where available.
7. Can I apply discounts and shipping charges?
Yes. The current order screen provides discount and shipping fields for applicable transactions.
Conclusion
Creating bills with EasyBillMatic is a straightforward process. From selecting products and managing order details to generating KOT, printing invoices, and completing payments, the POS workflow helps restaurants organize their daily billing activities.
Whether you operate a cafe, bakery, restaurant, or food outlet, EasyBillMatic can help simplify your billing and order management process.
Visit EasyBillMatic to explore POS billing solutions for your business.